Change Faces in Group Photo
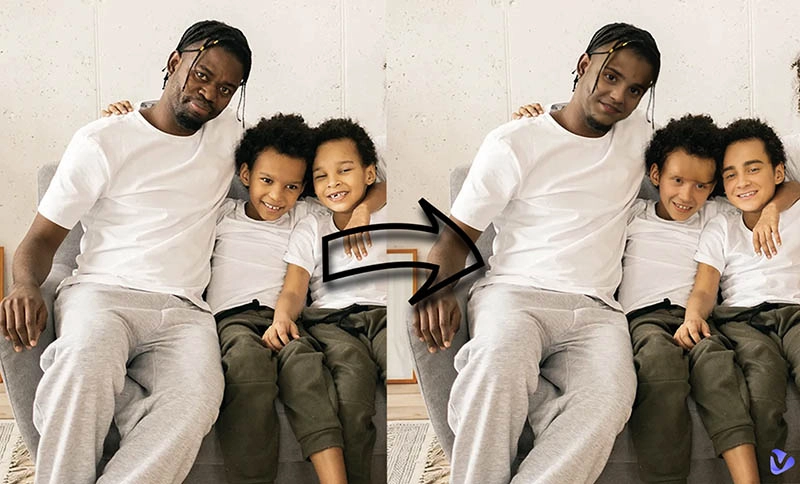
In today’s digital age, altering photos has become as easy as tapping a few buttons. But what if you want to change faces in a group photo? Maybe someone blinked at the wrong moment, or a friend was caught in an awkward expression. Perhaps you want to switch faces between two people for a fun, creative result. No matter the reason, learning how to make multiple face swaps can enhance your pictures, and with the right tools, it’s easier than ever.
Tools You Need to Change Faces in a Group Photo
Before diving into the process, let’s take a look at some essential tools you can use to change faces in your photos. Some of these tools are beginner-friendly, while others offer more advanced features for those who want more control over their edits.
- Photoshop (Paid): Photoshop remains one of the most powerful and popular photo editing tools available. With its detailed layering and masking features, you can swap faces in a group photo with ease, ensuring a seamless blend.
- Face Swap Apps (Free/Paid): There are various face swap apps available, like FaceApp, Reface, and Face Swap Live. While these apps might not offer the same fine control as professional software, they are perfect for quick edits and fun swaps.
- Online Tools (Free/Paid): Websites like MioCreate, Canva, or Pixlr offer online photo editors with face swap capabilities. These are perfect for beginners who want quick fixes without downloading software.
Step-by-Step Guide to Changing Faces in a Group Photo
Changing faces in a group photo may sound like a complicated task, but with the right tools, it’s a manageable project. Here’s a simple guide to get you started, using Photoshop as an example. (Note: The process will be similar in other photo editing tools.)
1. Open Your Photo in Photoshop
Start by opening your group photo in Photoshop. You’ll want to ensure that the photo is high-resolution for the best results. You can do this by going to File > Open, and selecting your image.
2. Select the Faces You Want to Change
Next, you’ll need to select the face you want to replace. Use the Lasso Tool or Quick Selection Tool to outline the face carefully. If you’re replacing more than one face, repeat this step for each face.
3. Cut and Paste the Faces
Once you have the faces selected, press Ctrl + C (or Command + C on Mac) to copy the selection. Then, open the photo with the face you want to swap into the group photo. Use Ctrl + V (or Command + V) to paste the face.
4. Resize and Position the New Face
Now, use the Move Tool to position the new face over the original one. Hold Shift while resizing the face to maintain proportion, making sure it fits naturally into the photo.
5. Blend the Edges for a Seamless Look
This is the trickiest part of face-swapping: making the new face blend seamlessly into the photo. Use the Eraser Tool with a soft brush to gently erase the harsh edges of the face you’ve pasted. You can also use the Clone Stamp Tool to match skin tones and shadows.
6. Adjust Colors and Lighting
To make the new face look even more natural, adjust its brightness, contrast, and color to match the rest of the image. Use Image > Adjustments > Hue/Saturation or Levels to fine-tune the skin tone.
7. Final Touches
Lastly, zoom in and inspect the image for any imperfections. Adjust any details, and make sure the lighting and shadows on the face align with the rest of the group. Once you’re happy with the result, save your photo!
Tips for Making the Face Swap Look Natural
Face-swapping isn’t just about copying and pasting—it’s about creating a convincing edit that doesn’t draw attention to itself. Here are a few tips to help make your face swap look as natural as possible:
- Match Skin Tones: One of the most important things to do is match the skin tones. If the skin tone of the new face doesn’t match the rest of the group, it will stick out like a sore thumb. Adjust the brightness and saturation until everything matches.
- Consider the Lighting: The lighting in the original image will play a significant role in how natural the face swap looks. Make sure the lighting on the face you’re adding matches the direction and intensity of the lighting in the group photo.
- Check the Expressions: Ideally, you want to make sure that the facial expression on the swapped face fits with the rest of the group. If someone is smiling while another person is serious, it could break the illusion.
Conclusion:
In the end, face-swapping in group photos is a helpful tool, whether you’re fixing a minor issue or experimenting with creative edits. By using the right tools and techniques, you can easily change faces in photos without compromising quality. Whether you’re a beginner or a pro, practice makes perfect, and soon you’ll be able to swap faces like a photo-editing expert!
If you’ve ever felt frustrated with a photo ruined by a bad expression or a blink, face swapping provides a quick and easy solution. It gives you control over your images, letting you perfect group photos with just a few clicks. So next time you’re faced with an imperfect shot, consider changing a face and bringing new life to the picture. After all, a perfect group photo is within your reach!


